Applications | Presentation & Meeting Timers
Need to stay on schedule for a business presentation, a church sermon, or a city council meeting? TimeMachines' presentation and meeting timers provide a powerful tool for a wide variety of business, studio, and church applications. Our presentation and meeting timers offer functionality and ease of use would make it a great option for a speech and debate timer, whether in a classroom or a government agency. While any of our single-color displays can be set up in count-up or count-down modes, the RGB displays can change colors throughout the countdown to queue the speaker, producers, or meeting facilitators of the time remaining. In version 2.0 of both TM-Manager (free for download from our website) and TM-Timer (a free download available on Google Play or from the Apple App Store), the presentation timer control feature was added to make multi-color options possible for the RGB displays. The presentation time, display colors at various stages, the timing of the color changes, and an alarm can all be customized to the specific needs of your application. This presentation program can run simultaneously on a single display, a few displays, or all of the displays on your network.

In the DEMO clock display above, the presentation program begins its countdown at five minutes, and the digits are green for GO. When there is less than one minute remaining, the timer changes to yellow to make the speaker aware that their time is running out. When time runs out, the digits become red for STOP, and the count up process conveys the amount of time exceeded. The TimeMachines® presentation and meeting timers, coupled with the RGB displays, provides a simple, straight-forward way to visually communicate as much information as possible for any presentation or meeting. This capability can be easily controlled using either the TM-Manager or TM-Timer applications. Read on to see the simplicity of these controls through both applications, as well as the range of customizations that are possible from the length of the countdown timer, the colors and intervals for transitions, the timing of the color changes, and even the triggering of alarms if a buzzer is installed.
Presentation Timer Setup with TM-Manager
Version 2.0 (or above) of TM-Manager is required to take advantage of the presentation timer controls for the RGB clock displays. Additional information on the application and how to install it can be found on the TM-Manager product page or the TM-Manager section of the Downloads page.
Once your TimeMachines® device(s) have been queried on your network, select the clock display or displays that you wish to use as presentation timers. If more than one display is selected, the presentation timer program will control all of those displays simultaneously and they will remain synchronized. Other displays that are not selected will continue to display time or continue programs that they have been triggered to run. In this example, only the DEMO display will be selected to run the presentation timer as seen in the TM-Manager application below.
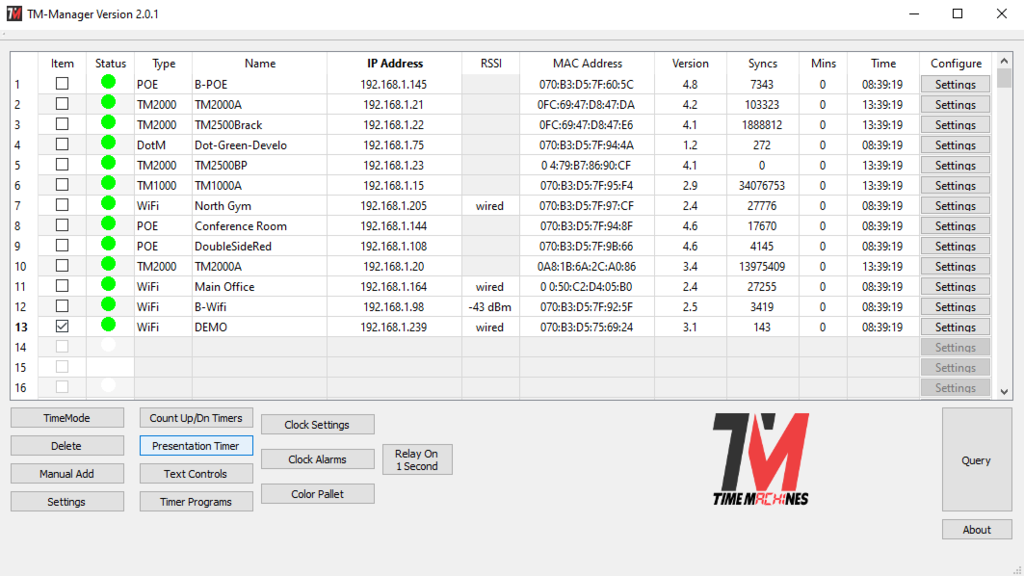
Click on Presentation Timer to open the program control window for the display items that are selected, in this case only the DEMO display will be used.
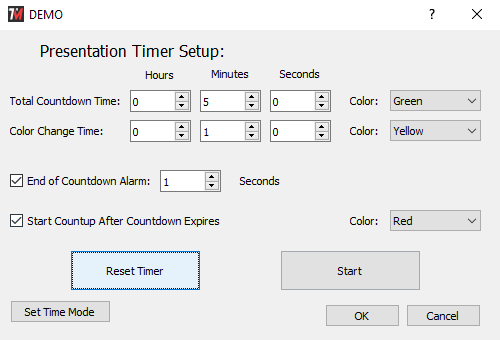
Entering this control panel will have no immediate impact on what is shown on the DEMO display. Assuming it was in clock mode originally, it will still be displaying time in its original configured display color. However, it is within this window that the presentation timer parameters can be customized - length of the presentation timer, the color of the displays at each phase, the time when the color changes will occur, whether or not to trigger an alarm, and the option to begin a count up event after the timer expires. Once all parameters are selected, click Reset Timer. The Reset Timer command is what sends the program parameters to the display(s) selected. As noted in the upper left corner, the control from this window will only impact the DEMO display.
The Reset Timer command changes the DEMO display from its original clock mode to presentation timer mode showing 00:05:00 in green. When the Start button is clicked, the countdown will begin on the display. At the 00:01:00 mark, the display color will transition from green to yellow at 00:00:59. When the countdown ends at 00:00:00, assuming an audible alarm system or a buzzer is installed through the relay connection of the display, the alarm will sound for 1 second. If no alarm is connected, selecting this box will have no effect. If Start Count-up After Count-down Expires is selected, when the countdown time expires, the display will change from yellow to red and begin to count up so it is clear how much time has transpired beyond the presentation time limit. If this box is not selected, when time runs out the display will return to clock mode in its configured color and display the time of day.
If you want to return to clock mode until the next speaker is ready, simply click Set Time Mode and the display will return to clock mode and the Presentation Timer window can remain open. When you are ready for the next speaker, assuming there are no changes needed to the program or which displays are used, simply click Reset Timer. The display(s) selected, in this case only the DEMO display, will return to display 00:05:00 in green until Start is selected to begin the next countdown program. If different displays are needed, simply exit out of the Presentation Timer control window to return to the home window of TM-Manager. Select the necessary displays, return to the Presentation Timer control window, set the appropriate parameters and click Reset Timer to send those timer parameters to the selected displays, and begin again.
Presentation Controls with TM-Timer
Version 2.0 (or above) of TM-Timer is required to take advantage of the presentation timer controls for the RGB clock displays. Additional information on the application and how to install it can be found on the TM-Timer product page or the TM-Timer section of the Downloads page.
STEP 1:
Upon opening TM-Timer, select the bottom button on the screen to "Query Timers." This should result in the display of all devices on this network that can be accessed for TM-Timer controls.

STEP 2:
Select any and all of the displays that you wish to control for your presentation timer. In this instance, only the DEMO display was selected, and the other two displays will remain in their current clock mode. Selection of multiple devices provides simultaneous and synchronized control of all displays selected.

STEP 3:
Select the menu “⋮” in the top left corner of the TM-Timer window to access the program control options for the displays selected. In this case, Presentation Controls will be selected.

STEP 4:
In this screen of the Presentation Controls, the Total Time represents the full length of the presentation in seconds. For a 5 minute presentation, you would enter 300 seconds as your total time.

STEP 5:
Change Time is the time left (in seconds) when the timer should change colors. Entering 60 seconds in this field, means that with one minute left in the presentation, the color of the display will change from green to yellow, helping the speaker recognize that their time is running out. In this example, when the timer gets to 1 minute, the 01:00 displayed will be in green, but the countdown from 00:59 will continue in yellow until time runs out.

STEP 6:
By selecting Enable Count-Up, the display begins a count up event when time runs out, which is emphasized with another color change from yellow to red. If this is not enabled, the display immediately returns to its clock mode to display time in its configured display color when the time runs out.
Selecting the Enable Alarm the relay will activate a buzzer if installed. If there is nothing installed through a relay connection, selecting this control has no observable change to any function on the display and will not emit any sound.

While this is the most basic use of the presentation timer shortcut using TM-Timer, there are additional ways to customize the program. This might include changing the colors at the various program steps if the green-yellow-red color changes are not suitable for your application. Additional color changes beyond the green-yellow-red progression could be added for more visual emphasis of the time remaining throughout the countdown. The length of the relay alarm triggered when time is up can be adjusted from the standard 2 seconds, to a shorter or longer duration. There are limitless options if you want to create a more complex presentation event using our presentation and meeting timers. Let's take a look at the easiest way to customize your presentation timer program starting with the shortcut program.
STEP 7:
Assuming that no other timer programs have been run, the Presentation Timer shortcut program will be in the active memory (RAM) of the clock. Select the  in the top left corner from the Presentation Control screen that you used in Steps 4 thru 6 to go back to the TM-Timer home screen where your clocks are queried. Then from the top left corner of the home screen, select the “⋮” to get to the timer control menu. Select Timer Programs.

STEP 8:
From this screen, the individual steps from the shortcut program are visible. Customization of the program can be done from this window within your local TM-Timer app. You can select the “⋮” of any step to edit the existing step, insert or delete steps, etc.

STEP 9:
The “⋮” on the right side of Step 1 is selected. Thus the step may be edited, another step inserted ahead of this first step, or the color change step can be deleted so the presentation countdown event begins in the original configured clock color.
STEP 10:
Under the edit screen, the type of function for this step can be changed to an entirely different function, or the conditions of the existing color change function can be changed. Hit Save when the edits are completed.

STEP 11:
Under the edit screen of Step 2, you can see the CountDown Function is selected and the options to adjust the start/stop boundaries of this initial countdown event beginning at 5 minutes. Because of the color change event, this countdown stops at 1 minute so the color change step can be inserted next.
STEP 12:
Once the program is customized for your application, press Reset to send the updated settings information from the local app to the display. Press Start if you wish to begin running the new program.
If you wish to have this program stored in the clock so that others can access the program (not just on your local app), you will need to go back to the TM-Timer home screen by pressing the in the top left corner. Then select the “⋮” to get to the timer control menu. Select Save All Programs. This will send (and overwrite) all programs from your local TM-Timer app to the the selected clock(s).
If several different presentation and meeting timers are needed, it will be best to create them from scratch. From the TM-Timer home screen, select Timer Programs. Select one of the ten different program slots from the pull-down menu from the Timer Program screen. Then create and customize each of the unique programs that are needed for your applications.
Keep meetings on schedule with our presentation and meeting timers program!
Single-color and multi-color RGB TimeMachines® displays models can all run the same presentation timer programs depending on their firmware. However, the color options within the presentation and meeting timers program will have no effect on a single-color display color selections since those displays only contain one color of LED. The count-down, count up, and alarm features will run identically in both single-color displays and the multi-color RGB display models. The Presentation Timer programs were added within the following firmware packages for our displays:
POE: V4.8 for serial number beginning with a "B", V5.1 for serial number beginning with a "C".
WIFI: V2.5 for serial numbers beginning with a "B", V3.5 for serial number beginning with a "C".
To experience the full visual color capabilities of TimeMachines® presentation and meeting timers program, select any RGB display and download TM-Manager or TM-Timer for FREE!
