Network Timer Clocks
Do you need more than just a clock? If you need a programmable clock timer, an interval timer, or a task timer, we have a solution for you! Do you need to let the speaker know just how much time they have left? Do you want to do interval training in the gym or at home? Do you need timers synchronized across a manufacturing plant? Do you want to individually control the clock within your classroom to become a timer for games, or quizzes, or cleanup time? Our network displays are flexible and our app for all of your timing needs is FREE!
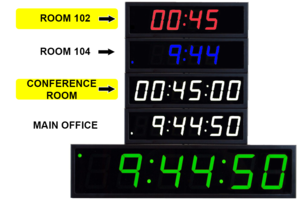
Our TM-Timer App will allow you to select exactly which of your displays are showing time, and which get "turned on" as a timer. The benefit of these network displays is that your timer functions can be synchronized in several rooms simultaneously or set up individually and used independently. The application works through WiFi to control displays (both WiFi and PoE) that are on the same local network. Each display can be named within your network by their location (Room 102, Main Office, North Gym, etc.). Thus, when you query the clocks on your app, you know exactly which display(s) to select to set and run your timer functions.
Our clock displays come with multiple timing features, from simple count up and countdown timers, to customizable preset buttons for countdown timers, and programmable clock timer programs for interval timing that you can create to be triggered by hand or at specific times of day. Our TM-Timer App is available on Google Play or from the Apple App Store. Keep reading to see how flexible and powerful this application is to meet a range of timing needs!
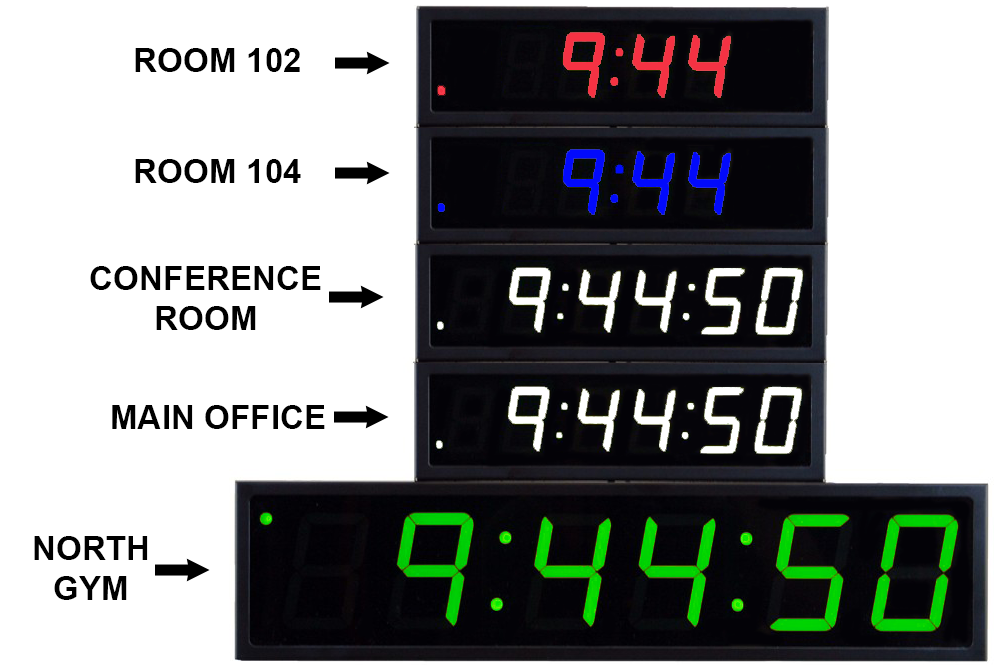
Count Up Timer Features
The simple Count Up Control feature is useful when simple task timing is needed. It begins timer functions at zero and continues a rolling count of elapsed time. The TM-Timer application allows you to select which displays on your network are utilized as timers and control them simultaneously.
STEP 1:
After you've downloaded the TM-Timer app, make sure your phone or tablet is using WiFi on the same network as the devices you will be controlling. Press QUERY TIMERS to request the listing of available displays on your network. Select any device that is needed to run the timer app - a single device, some combination, or all of them. In this case, Room 102 and Conference Room will be utilized as timers.
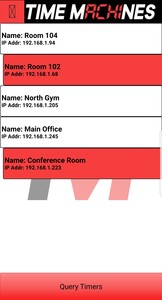

Under default settings, all displays on the network show time that is synchronized to the time source specified in the set-up page.
STEP 2:
Go to the Menu in the top left corner of the app and select "Count Up Controls." This will take you to the simple count up menu screen. At the bottom, there are two options for you the count-up timer is displayed. MIN:SEC.tSec or HR:MIN:SEC. Once your selection is made push RESET so the selected mode is sent to the device(s). Press START to begin the count-up mode on the selected displays.
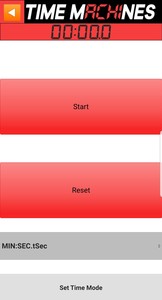
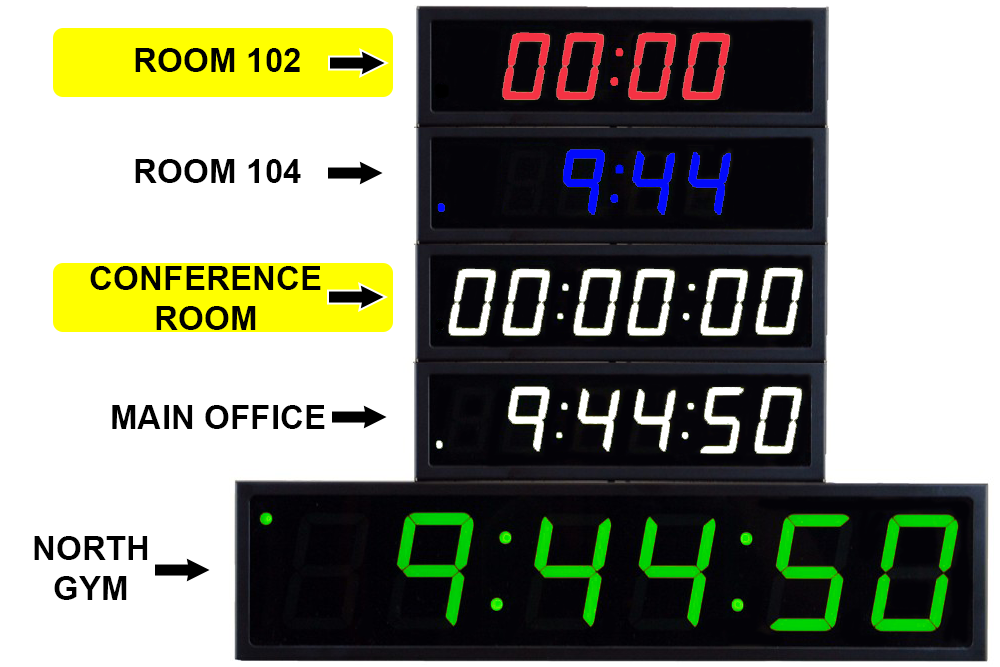
Once Room 102 and Conference Room were selected in the TM-Timer application, and the count up timer mode was entered, the devices that were selected to be in "timer mode" go to zero and are ready to begin the program. If you change to the HR:MIN:SEC mode, don't forget to hit RESET prior to starting the timer!
STEP 3:
Press PAUSE when the event is finished. The app and the displays will both show the elapsed time. If you want to resume the count-up timer, press START again. If you want to reset the timer back to zero, press RESET to clear the displays and you can begin again. Alternately if you want to return all of the devices back to clock mode, press SET TIME MODE. If you wish to resume count up timing after being in clock mode, you will need to return to the application menu and select Count Up Controls again.
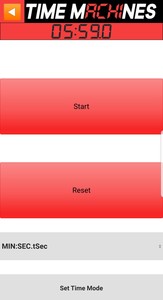
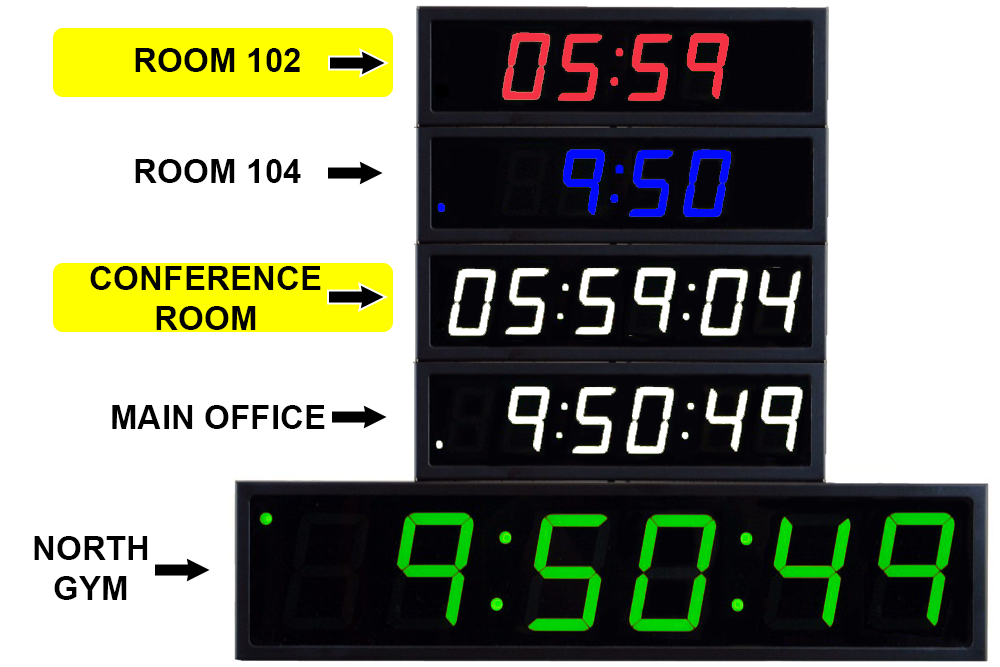
The count up timer was run simultaneously on the Room 102 and Conference Room displays, while the other three were still utilized as clocks. The timer app was stopped after 5 minutes and 59.04 seconds had elapsed.
Count Down Timer Features
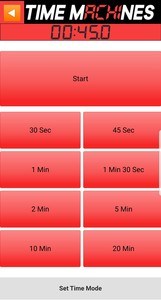
The simple Count Down Control feature has 8 preset buttons of varying countdown times that can be set up within the application. Each button can be customized to a specific countdown period and named according to your specific needs. The TM-Timer application allows you to select which displays on your network are utilized as timers and start the countdown event simultaneously from your smart device.
STEP 1:
After you've downloaded the TM-Timer app, make sure your phone or tablet is using WiFi on the same network as the devices you will be controlling. Press QUERY TIMERS to request the listing of available displays on your network. Select any device that is needed to run the timer app - a single device, some combination, or all of them. In this case, Room 102 and Conference Room will be utilized as programmable clock timers.


STEP 2A:
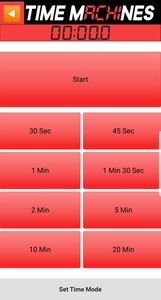
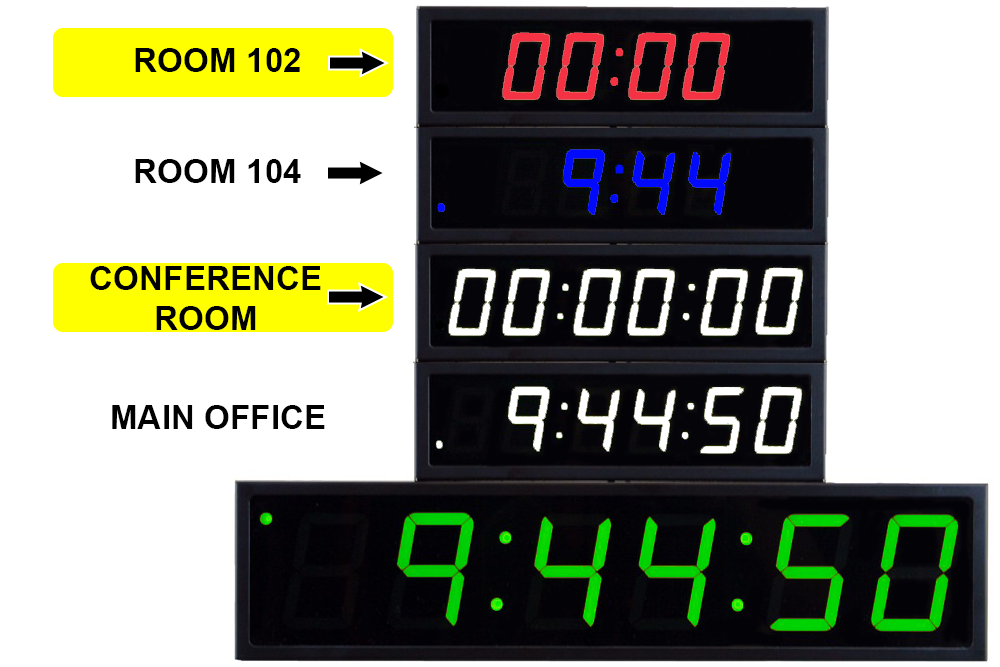
Go to the Menu in the top left corner of the app and select "Count Down Controls." Once the Count Down Controls are selected, the countdown menu screen will be displayed. The devices on the network that were selected for the countdown will no longer be in clock mode and will reflect "zero time" until the specific time interval for countdown is selected.
STEP 2B:
Select the countdown interval to be run. The coun down time should now be displayed on the selected devices as well as on the app screen. If you decide on a different interval, simply press that button instead. Both the app screen and the displays will update to the new interval. Currently a 45 second countdown segment has been selected in the MIN:SEC:tSec display mode.
STEP 2C:
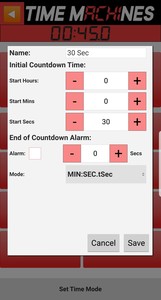
If the preset time periods do not meet your needs, press and hold any button to get to the settings for that particular countdown interval. This screen allows you to change the button name, the countdown time segment, the display mode of the countdown event (MIN:SEC:tSec or HR:MIN:SEC), and alarm settings that trigger the relay switch on the devices at the end of the event.
SETTINGS:
- HOURS: 99 is the max # allowed
- MINUTES: 60 is the max # allowed
- SECONDS: 60 is the max # allowed
If you wish to display 90 minutes, it would need to be entered as 1 hour, 30 minutes, 0 seconds.
ALARMS: If your clock is not fitted with a relay that is connected to a buzzer, bell, or some external notification device, the alarm settings do not enable anything further.
Step 3:
Press START in the application to begin the countdown. The countdown will be synchronized and displayed on both the app and the selected devices on your network.
- If you need to pause the countdown, simply press the PAUSE button, which is in the same location as the original start button. Then press the START button when you are ready to resume.
- If you need to reset the timer to start over once a count down has begun, simply pause the countdown from the app, re-select the time interval to reset the displays, and press START to begin the countdown.
When your timer runs out, the displays will flash zeros, and your application screen will also show that time has run out. If the clocks are enabled with a relay for alarms, then those alarms will sound for the period of time that was established under the settings for that specific countdown interval.
- If you wish to use the same clocks for another countdown segment, simply select the specific countdown interval button and start again.
- If you want the clocks to go back to displaying time, press Set Time Mode. Once Time Mode has been resumed for the displays, you will need to go back to the menu in the application if you want to set up another round of timer functions.
Programmable Interval Timer Features
Do you need a programmable clock timer with more complex timing features? An interval fitness timer? A cycle timer? A task rotation timer? Whether you are at the gym, on the shop floor, or in the classroom, TM-Timer can provide much more complex features for your customized timing needs.
TM-Timer allows you to customize, edit, and save 10 unique custom timer programs on your personal smart device. Each can be programmed with a variety of steps including count up and/or count down segments, interval cycles, repeating segments, and complete customization right down to the name. When you enable the WiFi on your smart device to the same network as the TimeMachines displays, you can then control each of these network devices at your fingertips!
Let's get familiar with the Timer Programs section of TM-Timer app so you can see how this powerful app can work for you!
The main screen for the Timer Program shows the steps of the program that is currently selected. Upon download of the app, a couple of standard Interval Programs will exist. These programs can be renamed and/or edited, and will be stored on your device for future use.
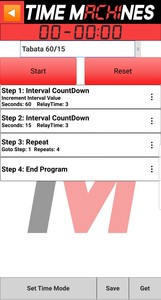
The pull down menu allows you to select any of the 10 program slots for editing. If you begin editing an existing program, while the program name can be changed, it overwrites the original program in the existing program slot - it does not save to a new slot. There are a max of 10 program slots within the app.
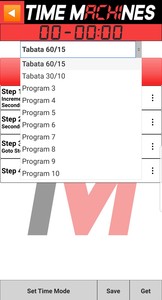
In this example, the app currently has two Tabata programs in existence and the other 8 programs are blank program slots, which by default, have only one step - End Program. Let's select blank Program 3 so we can get familiar with the functions and editing a blank program slot.
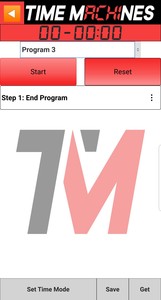
When you choose INSERT, a default END PROGRAM step is created ahead of the step that is selected.
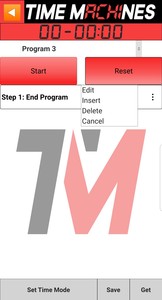
Select EDIT on the menu for Step 1: END PROGRAM to see how you can begin your program.
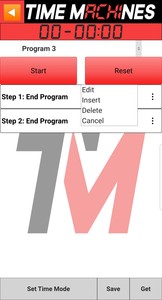
The Function screen will be displayed, and the variety of options for this step will be displayed by selecting the menu pull down.
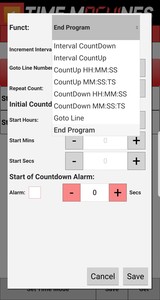
Let's go through the variety of options on the Function menu for editing a Timer Program.
For all of the CountUp/CountDown function options, interval and non-interval alike, the overall time in hours, minutes and seconds required for each step will need to be entered and saved. If an alarm is connected that should be enabled to signal the start of a step, the duration of this relay trigger will also be programmed for these functions. If you want an alarm at the end of a step, it can be set up as its own step where the duration of the step is the same as the alarm duration, or it can be triggered as part of the start of the next segment, or finally, if it is the last step of the program, the End Program step can programmed for the duration of your final, concluding signal.
Interval CountDown & Interval CountUp
The interval functions use the left hand digits of your display (the hours position of the clock) to track and display the Interval or Round number of the program. Thus for a 6 digit display you will see INT: MIN:SEC, while for a 4 digit display, you will see INT: MIN. For the interval to increment and be "counted", the Increment Interval # box must be selected. If there is a step that is being set up as a rest in between rounds where you do not want the interval to register, leave the Increment Interval # box un-selected.
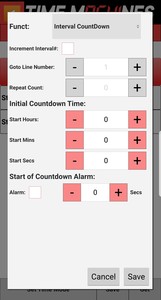
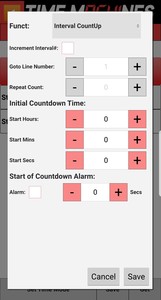
Interval CountDown: The overall time (minutes, seconds) will be displayed at the start of this step and count down to zero before continuing to the next. Since the displays show the interval in this function mode, only minutes and seconds are displayed. If the programmed time exceeds 59 minutes and 59 seconds, then the full time will not be shown on the display at the start of the step. The full programmed time will be tracked and elapsed before proceeding on to the next step, but due to the limitation in display digits, hours cannot be displayed in the interval mode.
Interval CountUp: Time will begin at zero and count up to the specified time programmed before continuing to the next step. If the programmed time exceeds 59 minutes and 59 seconds, the full time will not be shown its entirety on the display at the end of the step. The full programmed time will be tracked and elapsed before proceeding on to the next step, but due to the limitation in display digits, hours cannot be displayed in the interval mode.
CountUp & CountDown (Non-Interval Steps)
These functions give you the most granularity of time because the full display is dedicated to showing elapsed time in a step. In this mode, intervals are not registered and no segments are allocated to track and display the interval or round.
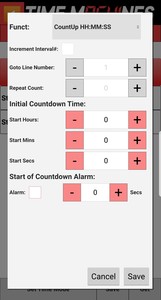
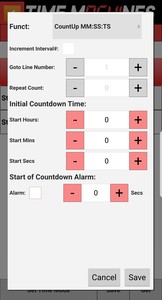
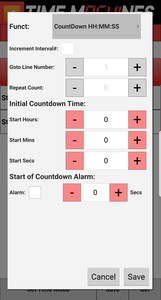
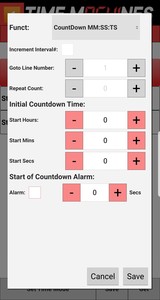
CountUp HH:MM:SS: Time will begin at zero and count up to the specified time programmed (hours, minutes, seconds) before continuing to the next step. A six digit display will show HH:MM:SS, while a four digit display will show HH:MM in this function mode, no seconds.
CountUp MM:SS:TS: Time will begin at zero and count up to the specified time programmed (hours, minutes, seconds) before continuing to the next step. A six digit display will show MM:SS:TS, while a four digit display will show MM:SS, without the tenths of seconds. If the programmed time exceeds 59 minutes and 59 seconds, the full programmed time will elapse prior to moving on to the next step, but it will not be shown its entirety on the display at the end of the step since hours are not displayed in this function mode.
CountDown HH:MM:SS: Input the overall time (hours, minutes, seconds) of this step. This time will be displayed at the start of this step and count down to zero before continuing to the next. A six digit display will show HH:MM:SS, while a four digit display will show HH:MM, but not seconds in this function mode.
CountDown MM:SS:TS: Input the overall time (hours, minutes, and seconds) of this step. This time will be displayed at the start of this step and count down to zero before continuing to the next. A six digit display will show MM:SS:TS, while a four digit display will eliminate the tenths of seconds in this function mode and be MM:SS. If the programmed time is longer than 59 minutes, 59 seconds, the hours will not be shown on the display in this function mode, although the full time will still be accounted for in the elapsed time prior to moving to the next step.
GoTo Line Function
This function allows you to repeat a single step or a sequence of steps that are programmed without needing to replicate these steps individually within the program.
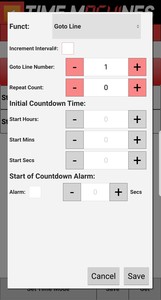
GoTo Line: When a GoTo Line step is inserted, input the line of the program that you want to return to, and the number of repeat counts that you would like to use and press Save. When the timer program is run, it will begin with the first step and continue to the second. When the program hits a GoTo step, it returns to the step that was programmed and will continue to repeat all steps in between for the number of cycles specified. After the repeat count has finished it will move on to the next step that is programmed after this GoTo Line step. It is possible to have GoTo Line steps buried within other GoTo Line steps.
End Program
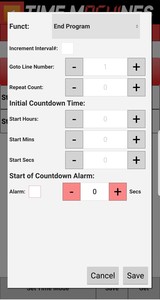
End Program: The final step of your program, by default, must be End Program. The final End Program step cannot be edited to become any other function. If you need a different step - Intervals, Count Up, Count Down, or GoTo - simply insert another step and continue building the program. In the final End Program function, the only customization possible is to enable and define a relay that can trigger alarms to signal the conclusion of the program. If there is more than one End Program Step within a program, the program will not run in its entirety, but rather it will simply stop at the first End Program step.
Information on Editing, Sending, Sharing, and Saving Timer Programs
EDITING PROGRAMS: There is a max of 10 program slots that can be edited and customized within the app on any of your personal smart devices. Before making any changes to a program, be sure that the program selected is the one you intend to edit or run, or you will be changing an existing program. For example, if you edit a program in slot three and save it under a new name, it will overwrite the current program in slot three, not create a separate program. Renaming a program does not save it to a new slot.
SENDING PROGRAMS and INITIATING DISPLAY CONTROLS: In order to control any single or several network displays, you must first QUERY TIMERS from your personal smart device. Once the network displays have been selected, and the program to be run is displayed within your app, press RESET. This will send the program steps, settings, and all necessary information to the RAM (volatile memory) of the selected network displays. It will be evident that the displays have received this information, as the selected devices will change from displaying time to displaying the starting point of Step 1. Without pressing RESET prior to hitting start, you will not have the control to initiate the timer program from your app.
SHARING PROGRAMS: Any Timer Program that you create can be shared with another user. Select a single network device, then select the program from your app that you wish to share. Once the program is displayed on your smart device, press RESET to send that program to the network display. User #2 can then open their TM-Timer app, QUERY TIMERS and select the same network display that just received the timer program. User #2 must select the program slot where they would like the shared program to be saved. Once that slot is selected from their app, User #2 presses GET and the program that was stored in RAM of the display will be retrieved and stored on their personal device (smartphone or tablet). User # 2 can then select other devices and use this shared program, on multiple devices or any other device they select. They will need to press RESET after the devices are selected to initiate control of the program from their smartphone or tablet.
FLASH (previously SAVE): The FLASH button in the Timer Program screen will move the currently selected program to the non-volatile memory of the network displays that are selected when FLASH is initiated. If a program is stored in the flash of a display, it can be retrieved even after a power cycle. Programs in RAM will be lost when power is cycled on a display. Keep in mind that one program may be stored in the RAM (volatile memory) and another program (the same or different) can be stored in the FLASH (non-volatile memory) of the display. The program in RAM will take operational preference when a program is initiated. With that in mind, be sure to press RESET to send the correct program to the display and initiate control of the timer displays from your personal smart device.
Purchasing Displays for Timer Needs
On a purchasing note, the 6 digit displays and the dot matrix displays offer the best granularity of timing capabilities. The 6 digit and custom dot matrix formats can display minutes through hundredths of seconds using the MIN:SEC:tSec mode, or hours through seconds using the HR:MIN:SEC mode. For the four digit formats, the MIN:SEC:tSec mode displays only the minutes and seconds, while the HR:MIN:SEC mode displays the hours and minutes. Thus, if you need the visibility of seconds on 4 digit displays, you MUST be in the MIN:SEC:tSec mode. Tenths of seconds will never be visible on the four digit displays.
With the functions listed above, our network clock displays provide a tremendous amount of flexibility as programmable clock timers. If you want an interval program for your fitness program or a CrossFit gym timer, a variety of custom programs can be created to meet your needs. If instead, you need a predictable shift program for a manufacturing site or a school bell system, that begins a timer program at specific times of the day, this application can be set up to work for these applications as well. Specific examples for each of these applications will be coming soon!
